Sometimes I wonder if anyone at Apple actually uses their products in the real world, episode #532,464: the iPhone QR Code Scanner app

QR codes are a convenient way to open a URL with your phone without having to type a long string of text (especially since it’s hard to avoid typos in a URL on a phone touchscreen).

But.

The iPhone’s QR Code Scanner app in the Control Center has a really annoying feature: It doesn’t open URLs in the Safari app; it opens them in its own embedded browser.

I’m not really sure why Apple chose to do this, or why they don’t realize what an issue it can create for users. What is that issue?

If you leave the app, when you go back to it, you’re back to the camera view for scanning a new QR code, rather than whatever web page you were interacting with.

There is no “history” in Code Scanner. No “back” button on the camera screen.

Sometimes this can be trivial. Sometimes not. Here’s a scenario I just went through that turned out not to be an issue, but it very well could have been.

It was time to renew the vehicle registration on my car with Minnesota Driver and Vehicle Services. (Yes, in most states we’re talking about the DMV, but since Minnesota always has to be different, here it’s DVS.) DVS is getting into the 21st century, and they’ve started emailing out the renewal notices instead of sending paper copies. And, the email included a QR code for me to jump-start the renewal process. Cool!

So, I scanned the code (off my Mac screen) with my iPhone, and started the process. (Maybe it’s possible for the Mac to read QR codes out of an on-screen PDF… I should investigate that.)

At the end of the process, since I was paying with my debit card, I got a pop-up alert from my bank’s app about the transaction. I would have ignored that, but I got two alerts from the bank. Worried I had double-submitted, I jumped over to the bank app. No, it was fine; the second charge was just the 2.15% credit card processing fee the DVS website had warned me about.

But now… oh no! I had been completing all of the process in the Code Scanner app, so the little “back” link at the top left of my iPhone screen took me back there, which of course forgot about that complex series of web form screens I had just stepped through, and blithely displayed the camera again for me to scan a new code. Damn! Was the process complete? Probably. I hope so. I opened up my email and saw a confirmation from DVS, so presumably everything was finished. But I won’t know for sure until I get my tabs in the mail. Ugh.

Now see, here’s the thing I keep forgetting in the moment. When you scan a QR code with Code Scanner, and that QR code is a web URL, Code Scanner opens the page in its own embedded browser. But there’s a little button at the bottom right to open the page in Safari.
If you have the foresight (or memory) to tap on that little Safari compass icon as soon as you’ve scanned a QR code, all will be well with the world. But if you’re just focused on whatever you’re trying to do with the web page you’ve just opened, it’s really easy to ignore the subtle interface differences between the two apps.

I shouldn’t have to play “Can you spot the differences?” like this is a kids’ placemat at a family restaurant in the 1980s. I shouldn’t have to remember to tap the Safari icon if I’m about to embark on a seven-part journey through the minds of the lowest-bid contractors who won the job to develop a government website.

Apple needs to understand how its products are used in the real world.
A reason to install Microsoft Edge on your Mac: viewing cookies

As a web developer, I actually don’t use cookies that often (mainly because I’m not interested in tracking users’ behavior). But I do need to use them occasionally, such as to remember when they’ve clicked the “X” to close a modal alert, so I don’t keep showing it to them on each new page they visit.

That’s what led me to today’s surprising discovery. My cookie wasn’t working properly, so I wanted to investigate a) whether or not it was actually being saved, and b) what data it was saving.

I work on a Mac, and Safari is my primary browser. But I already knew Safari doesn’t let you inspect the contents of cookies, so I fired up Chrome, which is my go-to for testing anything that I can’t test with Safari. I know Chrome always used to let you inspect the contents of cookies, so imagine my surprise today when I discovered that, at some point fairly recently, Chrome apparently removed that capability. You can still see which sites have stored cookies, and how many, but you can’t investigate the details any further than that. Seriously??

Next I tried Firefox. Nope, same.

At this point I was highly dubious that the fourth browser in my testing queue would handle things any differently, but I had no alternative, so I reached for that rarely-clicked-upon blue-green swirl icon in my Dock, loaded my page in Microsoft Edge, and… what do you know, Edge does still let you inspect the exact contents of stored cookies.

But for how long?

Anyway… for now, I have a justification for keeping Edge installed on my Mac.

Get Gmail to scale inline images to fit the browser window (in Chrome and Safari)

If you use Gmail on the web as your main email platform, and your work often involves people sending you emails with large high-resolution images (which ideally would be attachments, but are often embedded inline in the message), you know this problem. The images are frigging huge in the browser window, and the viewing panel ends up with a horizontal scrollbar, with paragraph text trailing off the screen. Having to scroll horizontally to read emails is really awkward and irritating! Why doesn’t Gmail at least offer an option to auto-scale inline images to fit the width of the window?

I discovered there’s a Chrome extension to fix this. If you’re a Chrome user, just download it and you’re done.

But I don’t use Chrome, I use Safari. And there doesn’t appear to be an equivalent Safari extension. I did, however, continue down the trail to the CSS file in the GitHub project for that Chrome extension. The CSS is quite simple:

[data-message-id] > div:nth-child(2) img:not([role=button]):not([role=menu]):not([width]) {
max-width: 100%;
width: auto !important;
height: auto !important;
}

That’s all it takes to get Gmail to shrink inline images in an email to fit the window. But how do you get Safari to apply that CSS? This is not so hard, either.

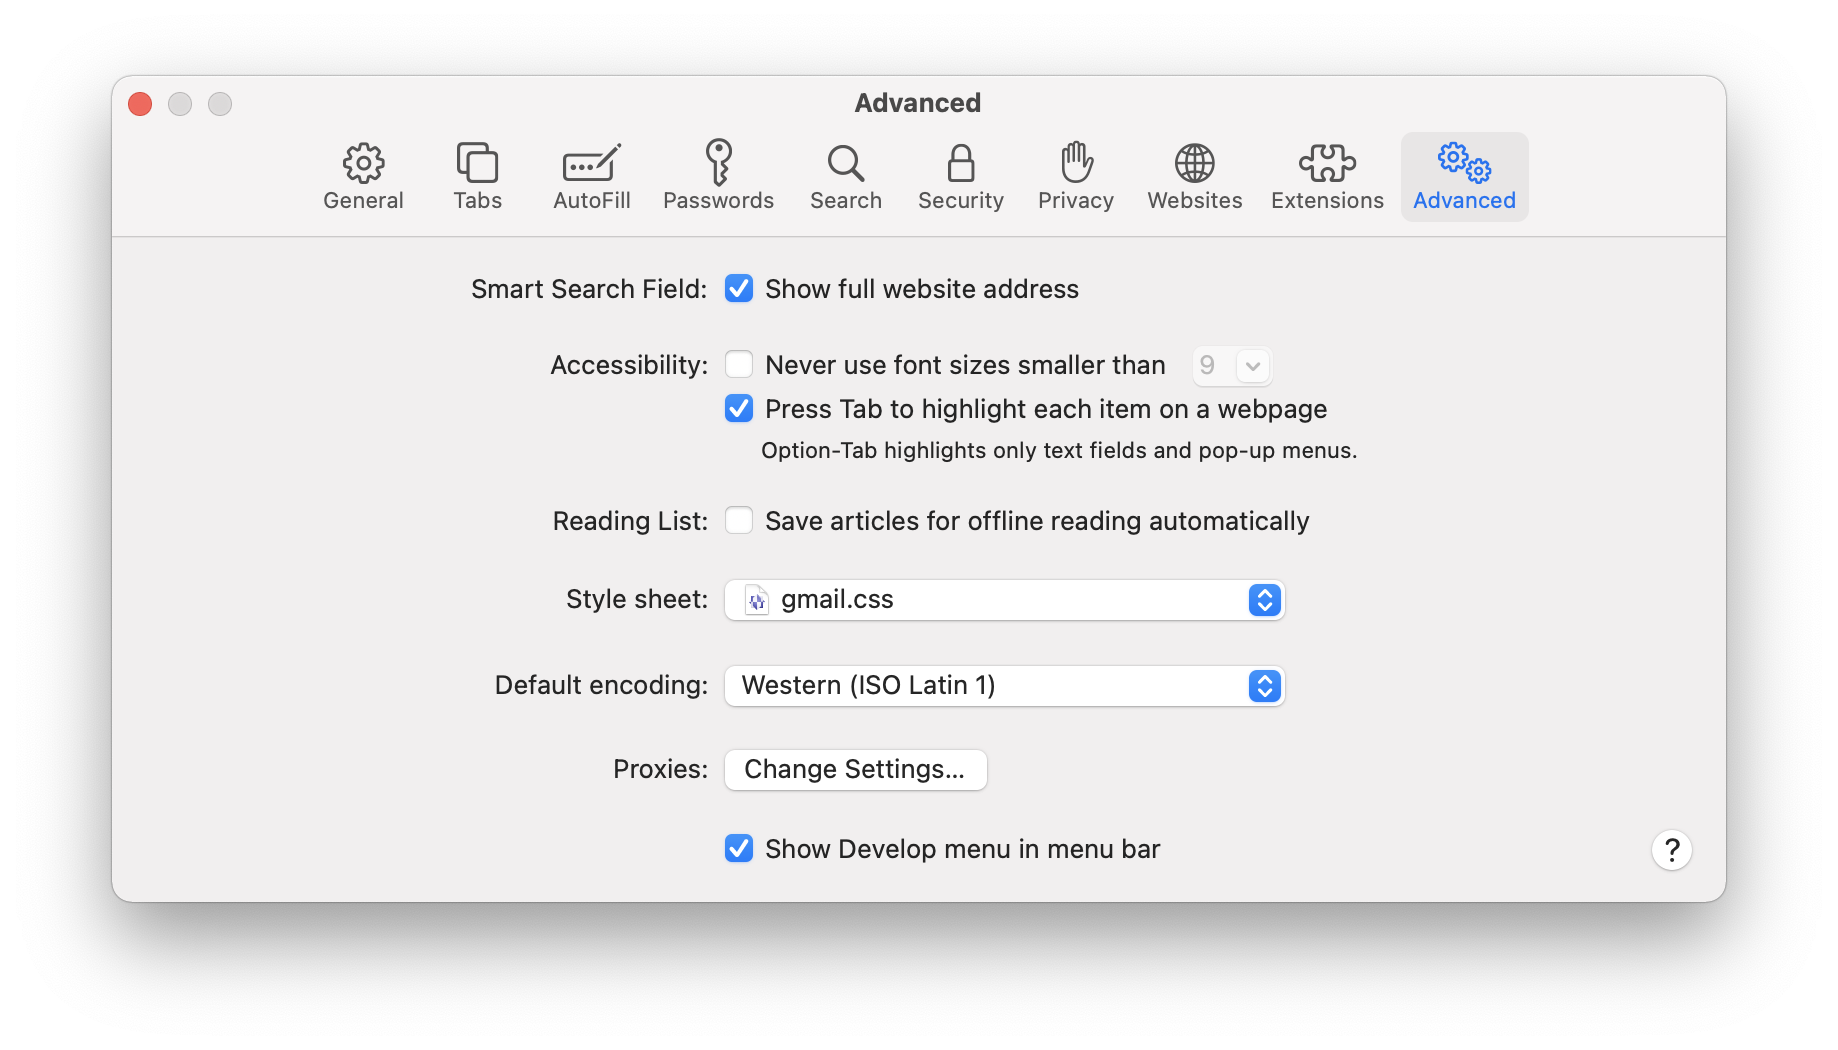
First, save the above CSS code into a file, maybe called gmail.css so you’ll remember what it’s for, and save it somewhere that makes sense to you, such as your Documents folder.

Next, open the Safari preferences, and click on the Advanced tab.

Click on the Style sheet dropdown and navigate to the gmail.css file you saved. That’s it! If you have a Gmail message containing a huge image open in Safari while you’re doing this, you should immediately notice the image pop down to a reasonable size. Huzzah!

How to get (Mac) Safari to stop showing Favorites and Siri Suggestions panel when clicking the address bar

Not only do I never use it, I scarcely ever even noticed it before, but in recent versions of Safari on the Mac, whenever you click the address bar, a large panel pops out under it, displaying Favorites and Siri Suggestions.

Like I said, I scarcely noticed it before, but I did notice it the other day when I was doing a screen sharing session with a client. Luckily I don’t have anything embarrassing in my browsing history for it to reveal, but my recent activity did convince Siri that I would be extremely interested in links pertaining to the Minnesota Twins. Which I was not at that particular time.

But then it occurred to me… I never — I mean never — click on anything in that panel, but it does add to the visual “noise” of my daily browsing activities. So there’s got to be a way to get rid of it.

Yes, there is. I hunted around for it, so you don’t have to.

First, let’s turn off Siri Suggestions. This is an insidious pathogen that has metastasized throughout macOS, so if you’re like me and never use anything Siri-related, let’s kill it everywhere.

Open up System Preferences and click on Siri

Then in the Siri preferences, click the Siri Suggestions and Privacy button.

I went through the full list of apps and unchecked all the boxes, but at the very least you’ll want to uncheck Show Siri Suggestions in App under Safari:

Now if you go to Safari and click on the address bar, you’ll see Siri Suggestions is gone, but the panel with Favorites still shows up. You can get rid of it entirely by going to Safari > Preferences and clicking the Search tab. (Which… uh… is that really the way its icon is supposed to look???)

Uncheck Show Favorites under Smart Search Field… and maybe everything else. Then put on your tinfoil hat, sit back, and relax!

My (just-discovered) workaround to the WebKit letter-spacing bug

Update (5/29/2012): Upon working further with the project that formed the basis of this post, I discovered that my solution did not work, or at least, no longer worked. It’s not uncommon as I get deeper into a project with a large CSS file that there are subtle, inadvertent effects of the various CSS properties that get added along the way. Looking back now, I can’t determine for sure whether my solution did once work with the simpler version of the site, and something else I added later counteracted it, or if I was just too eager about a solution to realize it never quite worked in the first place. As a result, I had considered deleting this post entirely, but I have decided to leave it live, to further the discussion of the topic, or at the very least to serve as a monument to my challenges.

WebKit, the rendering engine “under the hood” in both Safari and Chrome, has a known issue handling the CSS letter-spacing property at certain small increments, and at certain font sizes.

Specifically, if defining letter-spacing in increments smaller than 1px or 0.1em, it seems to just ignore the property altogether… except at larger-than-default sizes.

I typically use em or % these days to define text sizes in CSS. So in my situation, I’ve found that my letter-spacing: 0.05em works if I also specify font-size: 125% (or larger), but if I have font-size set to 100% or less, the letter-spacing gets ignored.

Typically, after loading reset.css, I set a baseline font size for the document with body { font-size: 100%; } (or some size… actually it’s usually 80% but these days I’ve been leaning towards larger type).

I decided to play around with this a bit to see if I could resolve the letter-spacing issue, and I found a nice, easy solution that works at least for the particular site I’m currently testing it on. Your experience may vary, depending on how your HTML is structured and how complex your design is.

Here’s the solution:

body {
  font-size: 125%;
  letter-spacing: 0.05em;
  line-height: 1.3em;
}

body>* {
  font-size: 85%;
  line-height: 1.3em;
}

You may want to adjust the exact values of font-size to suit your needs. (And, yes, I’m aware that mathematically 125% and 85% don’t cancel each other out, but they’re close enough for my purposes.) It’s important to include the line-height property in body>* to define your target line height; otherwise your lines will be too far apart. Set it to whatever your ideal value is. (I usually prefer line-height: 1.5em personally, but for larger type, as on the site I’m currently working on, it gets too spaced-out.)

So what’s going on here? Well, strangely, it seems WebKit can actually render smaller type with line-spacing less than 1px or 0.1em just fine, but it won’t unless somewhere in the “cascade” the type has been defined as being a certain amount larger than 100%. I don’t get it, but until the bug (which it seems clearly to be after all of this) gets fixed, at least this seems to be a reasonably clean workaround.

It’s very important that you use body>* and not just body *. If you don’t know why, well… try it out and see. (The upshot: we’re applying a uniform scaling-down across the board on all elements directly under body, which is practically the same as just defining our target font size directly on body itself, but with the benefit of working around the letter-spacing bug.)

Note: I have only tested this using em as the unit of measure for letter-spacing. I’m aware of the issue with px as well, but I’m not sure this solution will work for that. But… really… just use em instead!