Some thoughts on the unintuitiveness of the Mac’s Menu Bar

(This post is adapted from a rambling Twitter thread I just posted.)

I was just reading Nick Heer’s post on transparency in macOS Big Sur and it got me thinking about a related issue I recently dealt with. This is not a new and questionable UI design choice Apple foisted upon us in 2020. It’s a fundamental UI element that dates back to the original 1984 Macintosh.

The Menu Bar.

Although the Mac (and, technically, the Lisa before it) was a ripoff of the original experimental graphical user interface (GUI) developed at Xerox PARC, there is one thing about the Mac that is distinctly different from every other GUI that exists, be it any iteration of Windows, Linux GUIs like GNOME or KDE, the old Sun workstations, even the NeXT OS that Steve Jobs led the creation of after his original ouster from Apple, which formed the basis for Mac OS X and everything Apple has created in this century.

The Menu Bar.

Every other GUI puts a row of menus into the window for each app. On the Mac, the Menu Bar is affixed to the top of the screen, and changes context based on which app is in the foreground. There is a conceptual detachment between apps and their windows on the Mac that does not exist in any other modern operating system, and if you don’t fully grasp that concept, it makes the Mac considerably more confusing to use.

I was reminded of this recently when I had to provide a bit of “tech support” for my parents. My parents are in their 70s. But they’ve had Macs since I first convinced them to buy a candy-colored original iMac over 20 years ago. They’ve only had Macs, although now they do most of their “computer” activities on their iPhones or iPad. But they still use the Mac for banking, printing documents, and a few other tasks that are still a bit obscure to them on the iPad.

And even though they’ve been using Macs for over a quarter of their lives, they still don’t “get” the Menu Bar.

We were on a FaceTime call and they asked me to help them figure out a problem they were having with their Mac. They were describing a weird problem they were having with Safari, and I just could not understand what the issue was. They were describing a sidebar with all of their email in it, and that they couldn’t make it go away.

Since we were doing FaceTime on their iPad, I eventually asked them to turn the iPad so I could see their Mac screen.

I know that their email is through Gmail (because I set it up), so I was expecting to see the Gmail web interface. But what I was actually seeing was the Mac Mail app’s interface. What? How did they manage to get Safari to display that? Then I realized what the problem was.

The Menu Bar.

They had Safari open, as the foreground app, but they didn’t have any Safari windows open. They also had the Mail app open; in fact, it was the only window open on their desktop. But because Safari was the foreground app, the Menu Bar, was saying “Safari” and had the Safari menus.

Why wouldn’t they have just clicked on the Mail window which would make it the foreground app? Seems obvious, but they are nervous novices, and they’re reluctant to click anything, ever, if they’re not sure what will happen. (I know they are not alone in this.)

I told them how to quit Safari, and then how to quit Mail, and they thanked me for fixing their problem. (Did I really though?) But it left me frustrated with the Mac.

Damn it, the Menu Bar is confusing. As loyal as I am to the Mac, putting menus within an app — making it so that the window is the app — is a lot more intuitive and logical than the way the Mac does it. How can an app be open if all of its windows are closed? It doesn’t make sense. Once you conceptually understand foreground and background apps, and have some technical understanding of how the computer works, it’s easy enough to take it all for granted. But at the surface level — which is all the average non-technical user grasps — it makes no damn sense to have the Menu Bar detached from the app it affects.

If there weren’t a thousand other reasons I prefer the Mac, I would be inclined to say that this detail alone makes Windows a superior OS. But it’s not.
Get Gmail to scale inline images to fit the browser window (in Chrome and Safari)

If you use Gmail on the web as your main email platform, and your work often involves people sending you emails with large high-resolution images (which ideally would be attachments, but are often embedded inline in the message), you know this problem. The images are frigging huge in the browser window, and the viewing panel ends up with a horizontal scrollbar, with paragraph text trailing off the screen. Having to scroll horizontally to read emails is really awkward and irritating! Why doesn’t Gmail at least offer an option to auto-scale inline images to fit the width of the window?

I discovered there’s a Chrome extension to fix this. If you’re a Chrome user, just download it and you’re done.

But I don’t use Chrome, I use Safari. And there doesn’t appear to be an equivalent Safari extension. I did, however, continue down the trail to the CSS file in the GitHub project for that Chrome extension. The CSS is quite simple:

[data-message-id] > div:nth-child(2) img:not([role=button]):not([role=menu]):not([width]) {
max-width: 100%;
width: auto !important;
height: auto !important;
}

That’s all it takes to get Gmail to shrink inline images in an email to fit the window. But how do you get Safari to apply that CSS? This is not so hard, either.

First, save the above CSS code into a file, maybe called gmail.css so you’ll remember what it’s for, and save it somewhere that makes sense to you, such as your Documents folder.

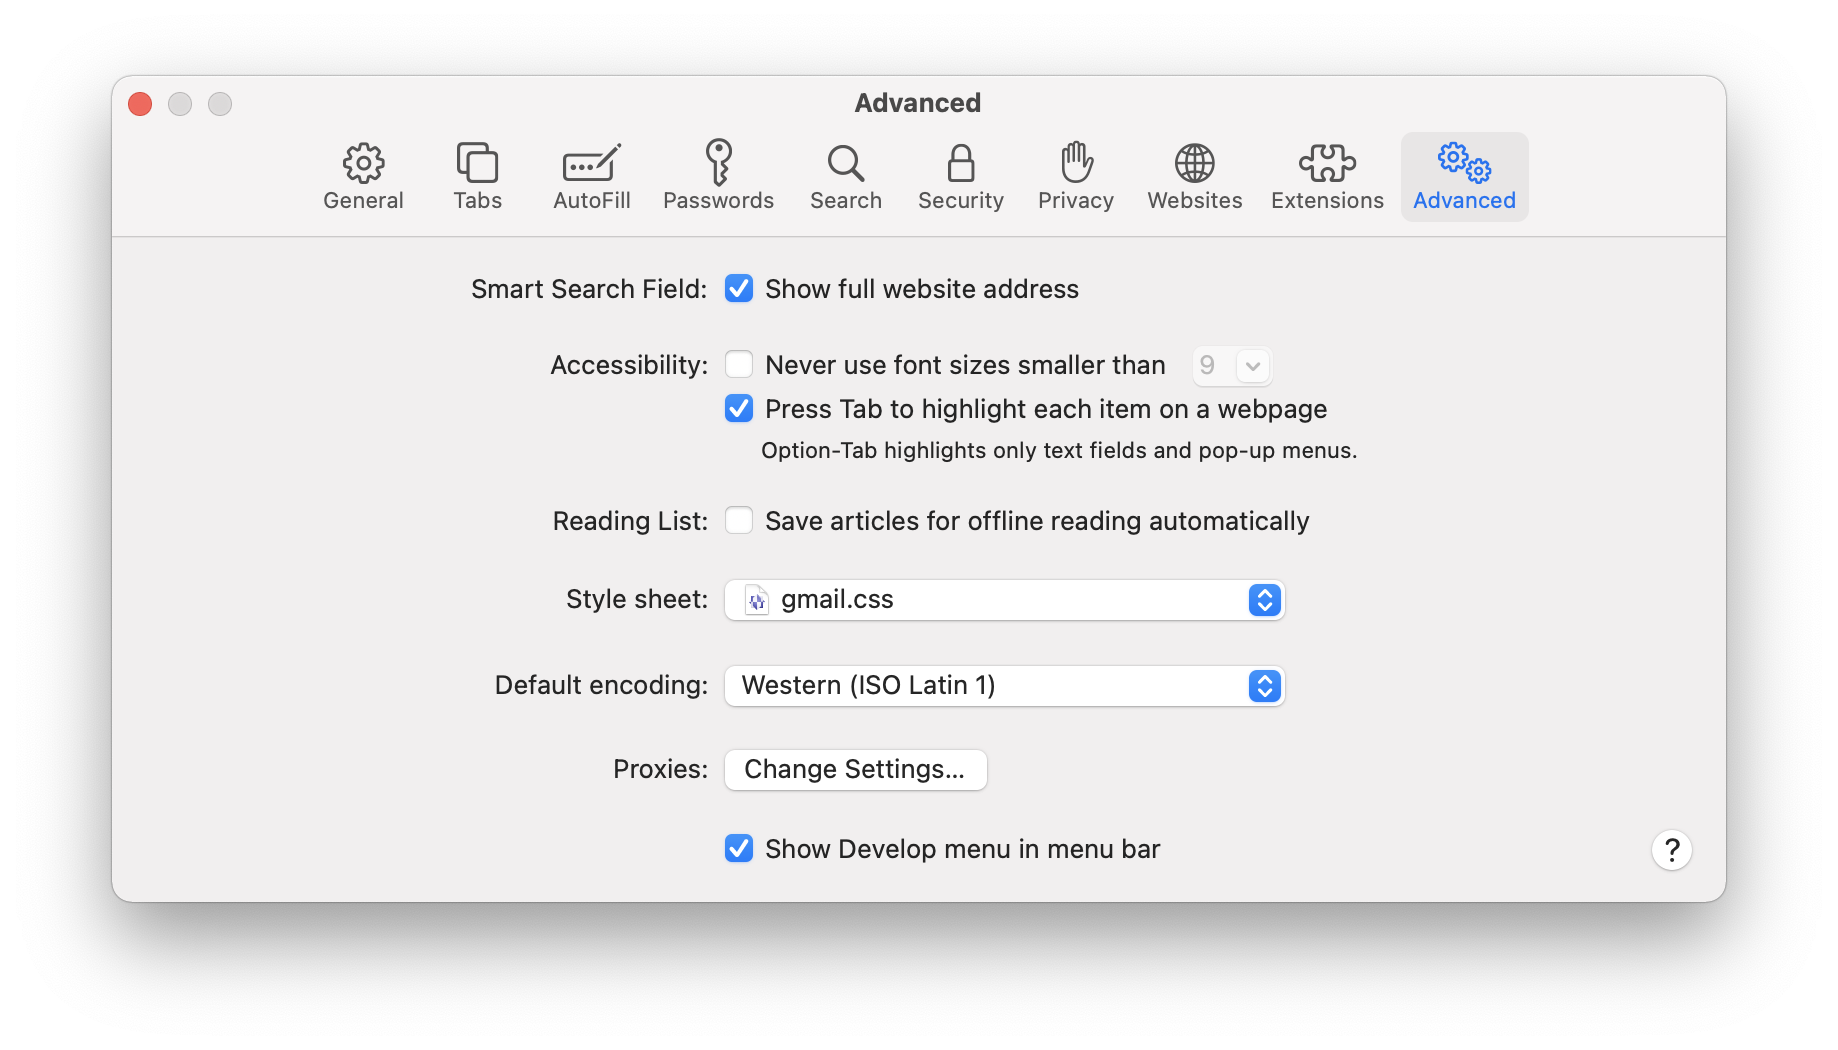
Next, open the Safari preferences, and click on the Advanced tab.

Click on the Style sheet dropdown and navigate to the gmail.css file you saved. That’s it! If you have a Gmail message containing a huge image open in Safari while you’re doing this, you should immediately notice the image pop down to a reasonable size. Huzzah!

CSS text-transform can’t do “sentence case” but there’s a really simple alternative

Need to capitalize just the first letter of a text string? CSS text-transform has capitalize but that capitalizes every word.

Fortunately, you can use the ::first-letter pseudo element! In my case, I wanted all of the links in my navigation to definitely start with a capital letter, so I went with this:

#primary_navigation a::first-letter {
  text-transform: uppercase;
}

Slick!

Get rid of that annoying “WebSocket connection to ‘…’ failed” error on WordPress sites running Jetpack

If you run a self-hosted WordPress site with Jetpack, installed, you may have noticed a frequent error message showing up in your browser console.

In Chrome it looks like this:

WebSocket connection to ‘wss://public-api.wordpress.com/pinghub/wpcom/me/newest-note-data’ failed: Error during WebSocket handshake: Unexpected response code: 403

In Safari it’s slightly less specific, but the issue is the same:

WebSocket connection to ‘wss://public-api.wordpress.com/pinghub/wpcom/me/newest-note-data’ failed: Unexpected response code: 403

This issue has been reported various places online but nowhere do I find a true fix.

As indicated in some of those support threads I linked to above, it’s due to an issue with the Notifications module in Jetpack. What? It’s something I was not even really aware of and that can be extremely easy to ignore, especially if your site is not blog-focused or does not have active commenting. Turns out Jetpack has this little “Notifications” icon up in the admin bar next to your Gravatar, where you can get the latest updates on what’s happening on your blog.

If you’re like me, you don’t need or want the Notifications tool. And if getting rid of it gets rid of that stupid error that’s constantly popping up in the console, all the better.

Side note: Did you know there’s a hidden page where you can access the settings for a ton of Jetpack modules? (Neither did I.) Just go to /wp-admin/admin.php?page=jetpack_modules in your WP admin and there it is! If you’re just dealing with this issue on one particular site, and don’t want to write any code, simply deactivate the Notifications module here and you’re done. If this is something you are dealing with on many sites though and you want an automatic, code-based solution to stick into your base theme, read on…

I tried using Jetpack’s instructions for disabling a module via code. (Fun fact, the name for this module in the code is not 'notifications' as you might expect; it’s 'notes'.) Frustratingly, neither the 'option_jetpack_active_modules' filter nor the 'jetpack_get_available_modules' filter worked. I even scoured the Jetpack source code for other filters I might need to use, and none of them made a difference.

Oh, I was able to get 'notes' not to appear in the array those filters returns, and I was even able to use that to get “Notifications” to always appear as “inactive” on that hidden settings page.

But the error kept showing up in the console, and the little Notifications icon was still in the admin bar. The module was not inactive.

Finally, through further source code poking, I discovered there’s a static public method called Jetpack::deactivate_module(). I tried running it in those aforementioned filters but it resulted in an HTTP 500 error. (Strangely, it was an out-of-memory error. Shrug.)

So I decided to try the method in different actions. After some trial and error, it seems the 'init' action works. But that’s a bit of overkill, running this code on every front end page load, especially since once the module is deactivated, it should stay deactivated, so my solution is to run it on the 'admin_init' action instead. Especially since this issue only happens for logged-in users anyway, it should be adequate.

Here’s a bit of code you can stick into your theme’s functions.php file or wherever you like to put things like this:

add_action('admin_init', 'rm34_jetpack_deactivate_modules');
function rm34_jetpack_deactivate_modules() {
    if (class_exists('Jetpack') && Jetpack::is_module_active('notes')) {
        Jetpack::deactivate_module('notes');
    }
}

A WordPress URL rewrite rule to phase out year/month folders in the Media Library

This is one of those fixes where it is probably worth me explaining the very specific use case I needed it for first, to serve as an example of exactly why anyone would need this, because on the surface it may seem pointless.

Picture this: Restaurant client. Table cards with QR codes linking directly to menu PDFs, so customers can look at the menu on their phones instead of using a physical print menu that has been handled by dozens of other people.

Note to the future: I’m not sure what the restaurant experience looks like in your world. What I’m describing may be ubiquitous for you now, or may be a complete head-scratcher. Assuming it’s safe for you to touch your head. For context, I am writing this in the midst of the 2020 COVID-19 pandemic.

Here’s the problem: Menus change. URLs referenced by a QR code do not. By default, WordPress automatically creates year and month subfolders inside wp-content/uploads and puts files in the folder for the year and month the post they’re attached to was created, or if you’re uploading directly into the Media Library, not attached to a post, then the year and month the file was uploaded.

So that means that the URLs embedded in my client’s QR codes contain 2020/09. But now it’s October, so if they upload a replacement file today, its URL will contain 2020/10 and the QR code will not work. I should note at this point that I do not like the default WordPress behavior of putting files into these subfolders, but I sometimes forget to turn off this setting when I’m creating a new site, or — as is the case here — I’m working on a site someone else originally set up.

My solution: Turn off year/month folders, so that any newly uploaded PDFs with the same filename will have the same URL. (Assuming the client deletes the old one first!)

You may be thinking, well, that’s great, if you had done this before the QR codes were created. Yes, exactly. That’s where this rewrite rule comes in.

When you turn off the year/month folder setting, it doesn’t move any existing files or change any code that links to them. This purely affects new uploads going forward. So what I need is a rewrite rule that will allow existing file URLs with the year/month path to continue working, while automatically removing that bit from the URL and trying to find the same file in the main uploads folder, if there’s no file at the year/month URL.

OK, here’s the code:

# Redirect file URLs from year/month subfolders to base uploads folder if not found
<IfModule mod_rewrite.c>
RewriteEngine On
RewriteBase /wp-content/uploads/
RewriteRule ^index\.php$ – [L]
RewriteCond %{REQUEST_FILENAME} !-f
RewriteCond %{REQUEST_FILENAME} !-d
RewriteRule ^([0-9]{4})/([0-9]{2})/(.*) /wp-content/uploads/$3 [L,R=301]
</IfModule>

This should go not in your main .htaccess file, but in an .htaccess placed inside your wp-content/uploads folder.

Let’s assess what’s going on here, line by line.

# Redirect file URLs from year/month subfolders to base uploads folder if not found

Just a comment so we remember what this is all about. You may think you’ll remember. But you probably won’t. Comments are your future friend.

<IfModule mod_rewrite.c> and </IfModule>

Apache configuration conditionals wrapper for all of our actions, to make sure this code doesn’t run if mod_rewrite isn’t enabled. Honestly I often leave this out because… come on, the entire site is going to be broken if mod_rewrite isn’t enabled.

RewriteEngine On

If you don’t know what this is about, RTFM. (The “F” is directed at the manual, not you. I hate the Apache documentation.)

RewriteBase /wp-content/uploads/

This is the reference point for the ^ later on. Needs to be the relative path of the uploads folder below your WordPress site’s base URL.

RewriteRule ^index\.php$ - [L]

Honestly we probably don’t need this line, as there shouldn’t be any index.php files inside your uploads folder anyway, but it just feels weird not to include it. This just says “don’t do any rewrites to the index.php file.”

RewriteCond %{REQUEST_FILENAME} !-f
RewriteCond %{REQUEST_FILENAME} !-d

These lines are very common in this type of rewrite instruction set, and in fact come straight from the default WordPress rewrite rules. They are saying, only apply the following rules to URLs that don’t match existing real files or directories under this path. This is critical to keep all of your existing Media Library URLs working.

RewriteRule ^([0-9]{4})/([0-9]{2})/(.*) /wp-content/uploads/$3 [L,R=301]

This is what we’re here for. Note we are using the magic of regular expressions to make this work. There are three parenthetical groupings, though we technically could eliminate the first two sets of parentheses and change $3 to $1, but I just like having the parentheses to help me keep things straight.

([0-9]{4}) is matching a 4-digit number, representing the year folder.

([0-9]{2}) is matching a 2-digit number, representing the month folder.

And (.*) is matching… anything, representing the filename. That’s the bit we want to reference in the replacement string, /wp-content/uploads/$3 which tells Apache to serve up the filename from the year/month URL directly out of the uploads folder itself.

The final bit, if you’re not familiar with rewrite rules, [L,R=301], just says this is the last rule the previous set of conditions applies to, and that it should return an HTTP 301 (permanent redirect) status along with the redirect, which is good SEO karma.