WordPress dev tip: How to move the Featured Image box up… to just below the Publish box

Whenever I’m doing development on a WordPress site that makes heavy use of taxonomies (it happens with meta data-rich portfolios for architects, for instance, which seems to be a niche for me), I get really annoyed with how much WordPress devalues the Featured Image meta box. I don’t want it shoved way down below all of the taxonomies, mainly because users will probably forget or never even know that it’s there!

What I really want is to have the Featured Image box near — but not at — the top of the sidebar. Specifically, I want it to come just below the Publish meta box.

I’ve found some resources online that almost got me there, but not quite. However a minor tweak to this example solves the problem for me.

I’m taking some shortcuts here, some of which you may not like. First, most tutorials on manipulating meta boxes encourage you to remove them and then add duplicates with a slightly different ID. I think what’s happening here though (not having inspected the source code!) is that your modifications to the add_meta_boxes action run before the standard WordPress meta boxes get loaded (possibly/probably because, as you’ll see, we’re setting the priority to high), so if you’ve created one with the same ID as a default box, yours takes precedence.

The other shortcut I’m taking, which I suspect will be more controversial (but it’s just the way I like to do this) is that I am creating an anonymous function directly within the add_action() call. That’s just a personal preference, but I like to do it because 1) it keeps the code more compact and 2) it avoids creating a bunch of named functions that have no business ever being called anywhere else anyway.

So what’s happening here? First, I’m creating the Publish meta box. Then I’m creating the Featured Image meta box. By giving them both high priority, WordPress makes them the first two meta boxes in the sidebar. The reason I have to create the Publish meta box is that, if I didn’t, Featured Image would come first, above it. I don’t want that.

I’ve set the $screen parameter to null so this will happen on all editing screens, but if you only wanted to move Featured Image up on posts and not on pages, for example, you could set it to 'post'.

Here’s the full code:

add_action('add_meta_boxes', function() {
  add_meta_box('submitdiv', __('Publish'), 'post_submit_meta_box', null, 'side', 'high');
  add_meta_box('postimagediv', __('Featured Image'), 'post_thumbnail_meta_box', null, 'side', 'high');
});

For more background, check out the official documentation on the add_meta_box() function.

Tips on saving vector images from Adobe Illustrator for SVG web use

With Internet Explorer 8 end of life coming on January 12, all kinds of new possibilities are opening up to us web developers who can finally start making use of technologies that have had wide support in modern browsers for years, but that we were reluctant to embrace because of the need for IE8-friendly workarounds.

For me, one of those things is SVG images. In recent years, especially since Responsive Web Design (and high-resolution displays) took off, I’ve been receiving web designs more and more in Illustrator format, rather than Photoshop. It’s great to get these assets as vectors that I can scale and size as I need in my build-out of high-res, responsive websites. But until now I had still been pulling vector assets over into Photoshop and producing multiple carefully-sized versions of things like logos and custom icons.

Now, however, SVG is a viable — in fact, preferable, given its flexibility and smaller file size (plus the ability to hack the XML code right in the image files themselves) — alternative to multiple PNGs of every image.

The thing is, while I have been using Photoshop extensively for over 20 years, I’ve never really gotten the hang of Illustrator. I know just enough to go into an Illustrator file, pull out the assets I need, and try not to screw anything else up in the process. That’s what this article is for.

Over the past week I have pulled a number of vector assets out of Illustrator designs as SVGs for a couple of projects, and I’m starting to get the process down. Here’s what you need to know.

The Steps

1. Select the object you want to make into an SVG. Most of the time designers will have grouped the pieces of the object together, so just a single click on the object will select it. Make careful note of the blue outlines to be sure everything you want is selected (and maybe even more importantly, that nothing else you don’t want is). You can also click and drag to select all objects within an area, or use the Layers palette to select the elements. This can be tedious, but be sure you’ve got what you need — and only what you need — highlighted. Once it’s selected, copy it to your clipboard.

2. Create a new document in Illustrator. Default settings are fine. Once the blank document appears, paste in the copied object. It should appear centered in the document. There should be a ton of space around it. That’s good. Since we’re dealing with vector art, scale is irrelevant. You just want to make sure everything fits within the boundaries of the document. (The “artboard” if you’re familiar with Illustrator speak.) Keep the object selected (blue outline). If you deselected it, just Select All.

3. Shrink the artboard to fit the object. If you don’t do this, you’ll end up with a bunch of blank space within the defined dimensions of the image and it will be impossible to work with. Good thing it’s super easy. With the entire object selected, go to Object > Artboards > Fit to Selected Art and you’ll get a perfect container.

4. IMPORTANT! If there are transparency effects within the object, you need to flatten it now. A lot of the time you can skip this step. But if you do, you may find that parts of the design are missing in the resulting SVG. I found it’s easy to forget this; I don’t find it intuitive that this would get lost in the SVG conversion. So go to Object > Flatten Transparency… Review the settings here to ensure you’re happy with them (sorry, I don’t have a lot of guidance here), and click OK Your image should not look different. If it does, undo, and repeat with different settings in the Flatten Transparency dialog.

5. Save. There’s no “Save for Web” option for SVG. Just regular ol’ “Save As”. Be sure to set the Format menu to SVG (svg). You could try compressed, but really SVGs are pretty small anyway, and I like to keep the code editable so I can tinker with it if needed. (Changing the color fill, for instance.) Once again there are a ton of settings presented in the SVG Options dialog, but I’ve found the default settings seem to work fine. (One change I have made is to set CSS Properties to Presentation Attributes but I’m not entirely sure yet what difference it makes.)

That’s it! You should now have an SVG ready for placement using an <img> tag, or as background-image in CSS. Just note that CSS treats SVG images a bit differently than regular JPEGs and PNGs, so you may need to add a few extra properties to keep the SVGs within their container elements in your page.

Make Advanced Custom Fields smarter about handling date fields

I love Advanced Custom Fields almost as much as I love WordPress itself. But that’s not to say it doesn’t have its problems. Most are obscure, and minor… and incredibly aggravating once you stumble upon them.

Here’s one such case. Date Picker fields are great, but no one seems to be able to agree on how to store dates in a database… other than insisting on avoiding Unix timestamps, the obvious choice.

ACF stores its dates, for some reason, in YYYYMMDD format (or, as we’d express it in PHP Land, Ymd). No delimiters at all. If you’re not going to use Unix timestamps, why not at least use the MySQL convention of Y-m-d H:i:s? But I digress.

I’m presently working on a project that merges some functionality of ACF and Gravity Forms, along with some custom code, to create a jobs board. It’s super-slick how Gravity Forms can create posts from a form submission, and even set them to pending review so a site editor can come in and review them before publishing.

But… dates. Jobs boards have a lot of dates. And while Gravity Forms offers a wealth of options for date string format, Ymd isn’t one of them. So it ends up storing the date value in the database in a format ACF doesn’t like. Because ACF is very picky. It wants that format, and no other. If the value in the field is not in Ymd format, the value displayed on the admin editing screen is just… blank. And then when you save, whatever was previously saved in that field is erased.

It doesn’t have to be this way. And thanks to the following bit of code, it won’t be. Now bear in mind, this is only altering what ACF renders on the editing screen. Once you’ve saved again from that point, the date will be stored in ACF’s preferred format, but up until then, it will be in whatever other format it was in when it landed in the database.

If you’re writing your front end code proactively, that won’t matter. Because you’re already assuming data inconsistency and using strtotime() to standardize any dates you’re working with in your templates, right? Of course you are.

OK, then. So the real goal here is just to get ACF to display the correct, saved date when you go in to edit the post, so it doesn’t then wipe out the date when you hit Save Changes.

In your functions.php file, or wherever you think is best (a plugin would be nice), do this:

function acf_smart_dates($field) {
  if ($field['value']) {
    $field['value'] = date('Ymd',strtotime($field['value']));
  }
  return $field;
}
add_filter('acf/prepare_field/type=date_picker','acf_smart_dates');

That’ll do.

The simple way to add a “force SSL” option in WordPress

There are plugins for just about everything in WordPress. But cluttering up your site with plugins isn’t always such a great idea. They add bloat that can slow down your site, and if poorly written can cause potential conflicts.

Plus, a lot of them are simply over-engineered. I hate that.

That said, I love good plugins, especially Advanced Custom Fields by Elliot Condon. I consider it essential to every WordPress site I build… which is a lot these days.

A site I’m currently working on has some pages that require SSL encryption. And I want the client to be able to turn SSL on or off on a per-page basis. But I didn’t want to use a plugin (besides ACF) to do it. [Disclaimer: you don’t actually need to use ACF for this; the standard Custom Fields capability will do.]

Before getting started, make sure your site actually has an SSL certificate installed and properly configured. And for this to work as shown, the cert needs to use the same domain name as the site itself. If it’s different, your redirect URLs will be a bit more complicated and will require some customization of this code, but it’ll still work.

First, set up your custom field. I’m using force_https as the field name, but it can be whatever. Make it a True/False field. (If you’re not using ACF, just remember you’ll be entering 0 or 1 as the value.)

Next, in your functions.php file, add the following:

add_action('template_redirect', 'my_force_https');
function my_force_https() {
  if (is_ssl()) { return null; }
  global $post;
  if (!empty($post->ID)) {
    if (!empty(get_field('force_https',$post->ID))) {
      $ssl_url = str_replace('http://','https://',get_the_permalink($post->ID));
      wp_redirect($ssl_url); exit;
    }
  }
  return false;
}

Picking this apart: We’re using the template_redirect hook. By this point the post has been loaded. We have all of the data we need, and it’s kind of our “last chance” to get WordPress to do a redirect before it starts rendering the page.

First we run the built-in WordPress function is_ssl(), because if we’re already on an SSL connection, there’s nothing to do. (And, if we didn’t do this check, we’d create a redirect loop.)

Next, if we have a post ID, we use the ACF function get_field() to check whether the force_https custom field is checked for this page. If it is, then we modify the page’s permalink to start with https:// and trigger the redirect. That’s it! [Note: If you’re not using ACF, you’ll need to use the built-in WordPress function get_post_meta() instead of get_field().]

Of course, that’s not quite it. You may notice after you have this working that your page loads with an https:// URL, but you’re still not getting the reassuring lock icon in your browser’s address bar. What gives?

Well, that’s because you probably have assets in the page that are loading over a non-SSL connection. In my experience, this is almost always because of images in your content that have a full, non-SSL URL. Browsers won’t give you the lock icon unless every asset on the page was loaded over an SSL connection.

So I’ve added this second function that strips the protocol from any instance of src="http://... in a text string. If you’re not familiar with “protocol-less” URLs, modern browsers allow you to omit the protocol — http:// or https:// — from URLs in your HTML, using just // instead, and the browser will automatically handle those with the same protocol used to load the page.

Using the filter the_content, this will automatically get applied to most page content and you’ll probably be good.

add_filter('the_content', 'my_strip_protocol');
function my_strip_protocol($content) {
  if (is_ssl()) {
    $content = str_replace('src="http://','src="//',$content);
  }
  return $content;
}

If you add this and you’re still not getting the lock, it means you probably have <img> tags within your theme that include full non-SSL URLs, or possibly some CSS or JavaScript assets that are being loaded over non-SSL connections. You’ll have to troubleshoot that yourself, but with the developer tools built into modern web browsers, that shouldn’t be too difficult. Remember, now that you have it, you can always use this my_strip_protocol() function directly in your theme files as well.

Just a side note about one of my idiosyncratic coding conventions: I always use !empty() when checking for a value that evaluates to true, but you don’t have to. It comes from my prior experience working with CakePHP. The benefit is that you won’t trigger any PHP warnings if the variable you’re evaluating hasn’t been declared.

Custom-designed <select> menus without a wrapper <div>

Most of the time I tell clients we can’t customize the appearance of <select> menus (a.k.a. “dropdowns”), along with checkboxes and radio buttons. I lay out a whole rationale on the part of OS and browser developers for why these elements can’t be customized, which is perhaps marginally factual. I do think these elements are, by intention, difficult to customize, in order to avoid confusing users. But designers want to design and, to be honest, the browser defaults for these elements are pretty freaking ugly.

Often there are complicating factors that really do make it effectively impossible to customize these elements. And so far I have not found any way to customize radio buttons and checkboxes that don’t involve “faking” them with images and hidden inputs. Solutions that may achieve the desired appearance but that are oh so ugly on the inside.

I’ll also admit that I am usually the developer on a project, not the designer. But at the moment I am working on a project where, OK, I’m still not the designer, but I have taken responsibility for extending the design, which affords/requires of me making some design decisions. And when I’m the one designing things, I care a lot more about finding a way to make them look exactly like what I’ve envisioned.

So, we come to <select> menus. While it’s not really possible to do much with radio buttons and checkboxes, there at least are some CSS properties that these menus will take. Unfortunately they vary a lot between browsers and don’t solve every problem.

Most solutions I’ve seen for modifying the appearance of <select> menus involve wrapping the menu in a container <div> or <span> tag, essentially removing all of the CSS properties from the menu element itself, and then styling the container as desired.

I hate this solution. I want to be able to style the <select> itself, and be done with it. And at last I have found a solution that mostly accomplishes this, with the caveat that it does not work in Internet Explorer before version 10. But I have a fallback for IE 9 and earlier that does almost everything. And I haven’t tested in Opera because… come on. (OK, I’ve heard Opera is popular in Europe, but to be honest all of my clients are in the United States and do not do business in Europe, so it doesn’t matter. No one I have dealt with has ever cared if their site worked in Opera. Or probably even known it exists.) I should also probably just note that my company no longer supports Internet Explorer 7 or earlier, so we’re only concerning ourselves here with making sure it at least looks OK in IE 8.

OK, so how does this work?

Pretty much every browser supports some basic customizations of the <select> menu with CSS, like changing the background color, font, text color, size, etc. But there’s extra browser “appearance” junk we need to get rid of. Mostly the little up/down arrow at the right end of the menu that is the visual cue to users that it is a menu. That’s an important thing… we need to still provide some visual cue that it’s a menu. But I want to make it look the way I want to make it look.

Let’s start by getting rid of the browser junk.

select {
  -moz-appearance: none;
  -webkit-appearance: none;
  appearance: none;
}

That removes all of the standard browser styling from Mozilla (Firefox) and WebKit (Chrome and Safari). I’m not sure we really need appearance or if it actually does anything in any known browser, but I saw it in an example somewhere and I hate using vendor prefixes without also including the non-prefixed version of the same property, so there it is.

So that covers three of the four major browsers. But what about Internet Explorer? There’s a tidy solution that works in IE 10 and later:

select::-ms-expand {
  display: none;
}

Now we have a <select> menu with none of the standard browser junk, and we can apply our styles as needed. As for Internet Explorer 9 and earlier, you’ll just have to live with the arrow thing at the right end of the menu. I’ll explain in a bit the way to add separate styles just for those earlier versions of IE, using conditional comments, in case you’re not familiar.

I do recommend designing your own “arrow thingy” icon for the right side of the menu, so users can still tell it’s a menu. Here’s an example of how your full <select> CSS might look. (This is fairly close to what I am using in the site I’m actually working on, although the colors, fonts and padding differ slightly.)

select {
  -moz-appearance: none;
  -webkit-appearance: none;
  appearance: none;
  background: rgb(238,238,238) url('images/select.png') right 5px center no-repeat;
  background-size: 9px 15px;
  border: 1px solid rgb(221,221,221);
  border-radius: 0;
  color: rgb(34,34,34);
  font-family: ‘Proxima Nova’, sans-serif;
  font-size: 100%;
  height: 2em;
  line-height: 2em;
  min-width: 60%;
  padding: 0 25px 0 10px;
  width: auto;
}
select::-ms-expand {
  display: none;
}

Here’s what the results look like in different browsers.

custom_select_browser_samples

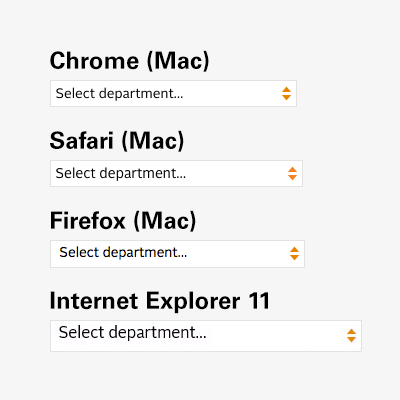
So, there’s an issue with the text alignment in Internet Explorer. As of this writing I’m working on resolving that. There are also some more minor variations between browsers in size and alignment, but that’s the nature of this business. Firefox also antialiases differently than Chrome and Safari, and I (usually) don’t bother trying to compensate for that. (The significant size difference in the IE sample is due to scaling at different breakpoints in my responsive layout… just a side effect of how I took the screenshots.)

That just leaves IE 9 and earlier. As I said, there’s no equivalent to select::-ms-expand before IE 10, so while we can change many aspects of the appearance of the menu, we can’t get rid of the standard arrow button thing. Unfortunately, if we implement the code above, we end up with both our custom arrows and the default ones, side-by-side. The only solution here is to get rid of ours, and remove the extra padding we gave it. This is where conditional comments come in. They’re well named: conditionals within HTML comments, recognized only by Internet Explorer. You can even target specific versions of IE with them. In this case, we just need to target versions before 10.

One common convention for conditional comments has you wrap the <html> tag itself in them, applying a class (e.g. ie8 that can then be used throughout your HTML everywhere else to target that browser. That’s great, but I never use it myself because I’ve gotten to a point where I rarely need to write any IE-specific CSS. So I just use the conditionals to load a separate ie.css file when I need it.

Here’s an example of how this might look. It should go in your <head> section, after you’ve included the main CSS file:

<!–[if lt IE 10]>
  <link rel="stylesheet" type="text/css" href="css/ie.css" />
<![endif]–>

And then in your ie.css file, you’ll need to override the background and padding:

select {
  background-image: none;
  padding-right: 0;
}

…and this is what it looks like in IE9 (and, just for fun, IE8 as well):

custom_select_browser_samples_ie

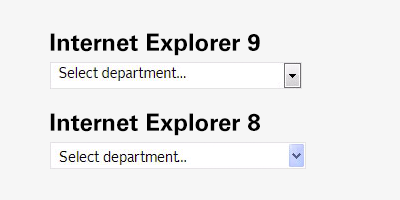
Obviously my styles are extremely basic — not really that different from what older versions of IE show anyway — but this does the job. As a test, I made the background bright red to prove it worked across the board. It does. But the results made my eyeballs bleed, so I’ll spare you.

But here’s something fun… how it looks on an iPhone with high resolution.

custom_select_browser_samples_ios

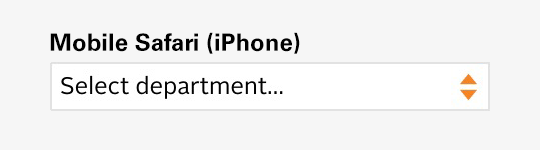
The arrow graphic is replaced with a high-res version using CSS3 media queries.

@media only screen and (-moz-min-device-pixel-ratio: 1.5),
  only screen and (-o-min-device-pixel-ratio: 3/2),
  only screen and (-webkit-min-device-pixel-ratio: 1.5),
  only screen and (min-devicepixel-ratio: 1.5),
  only screen and (min-resolution: 1.5dppx)
{
  select { background-image: url('images/select_x2.png'); }
}

(Yes, there’s an Opera vendor prefix in there. Forget about what I said earlier. Or not. This is just a standard block of code I always use for high-res images in my media queries.)

Depending on the complexity of your design, this approach may not offer quite as much control as you need, compared to the <div> wrapper approach, but if you’re just trying to get something clean and simple, with customized colors and fonts and without the outdated 3D styles most browsers stick you with, this should do the trick.