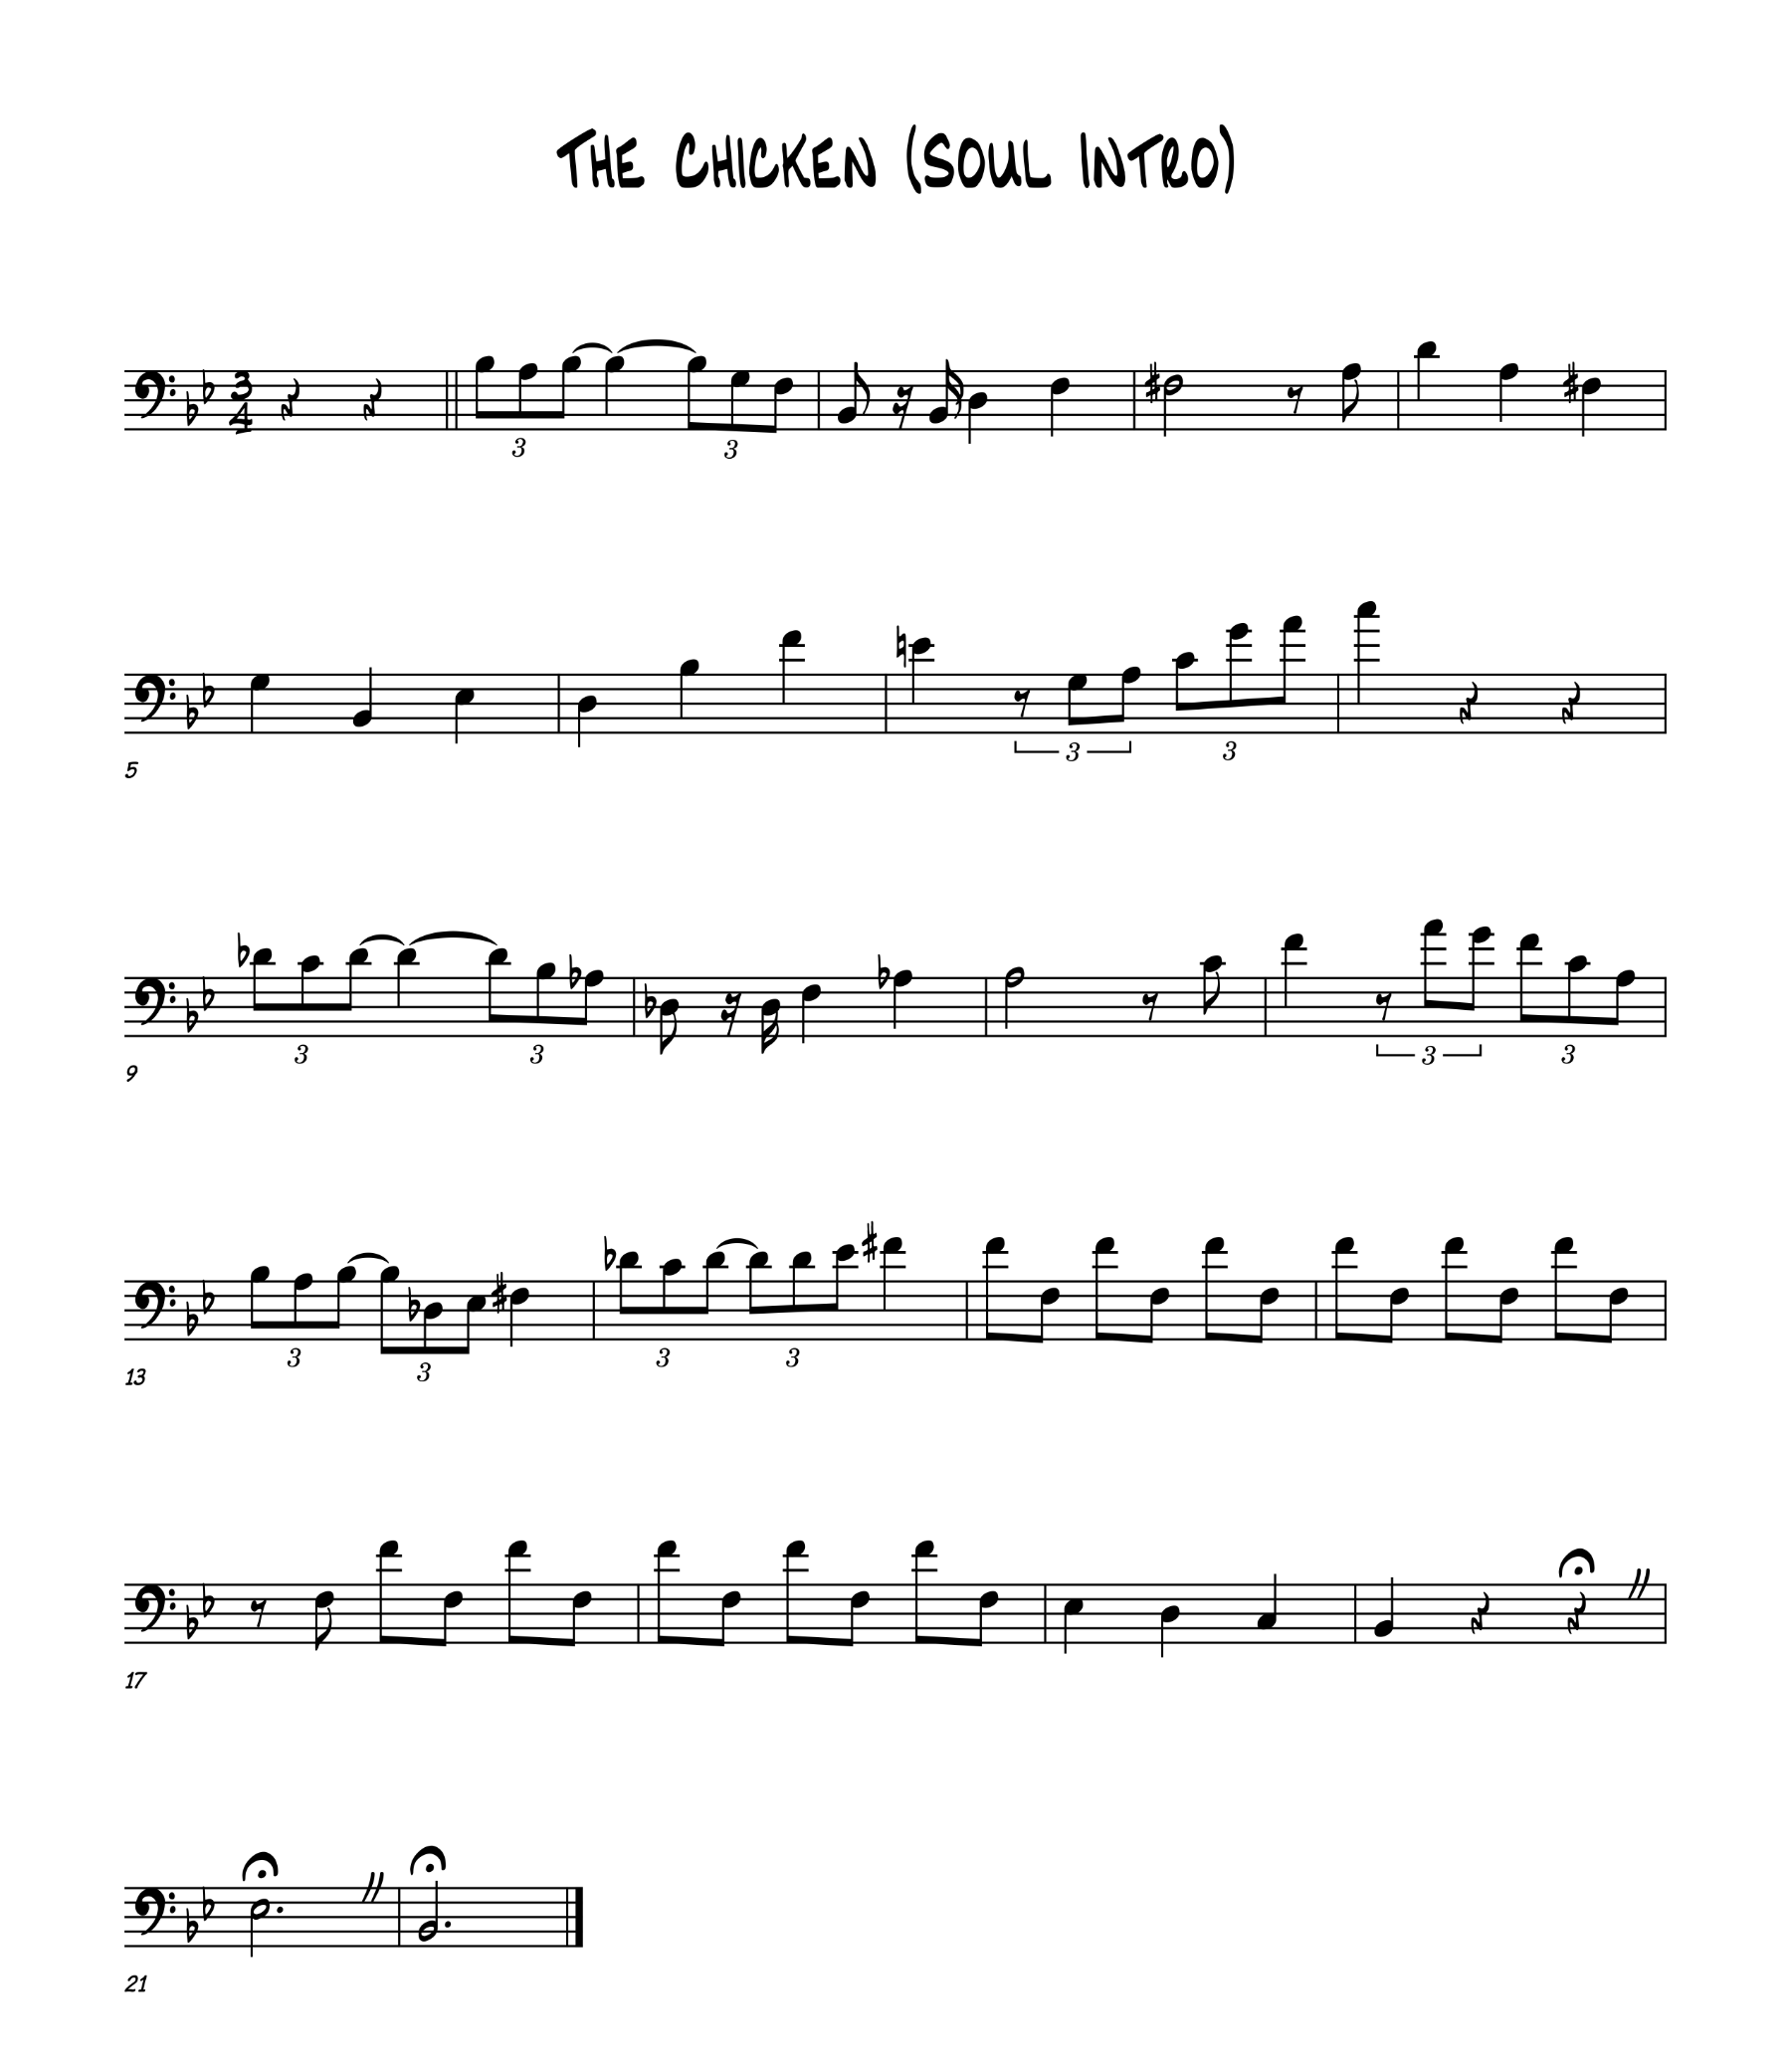
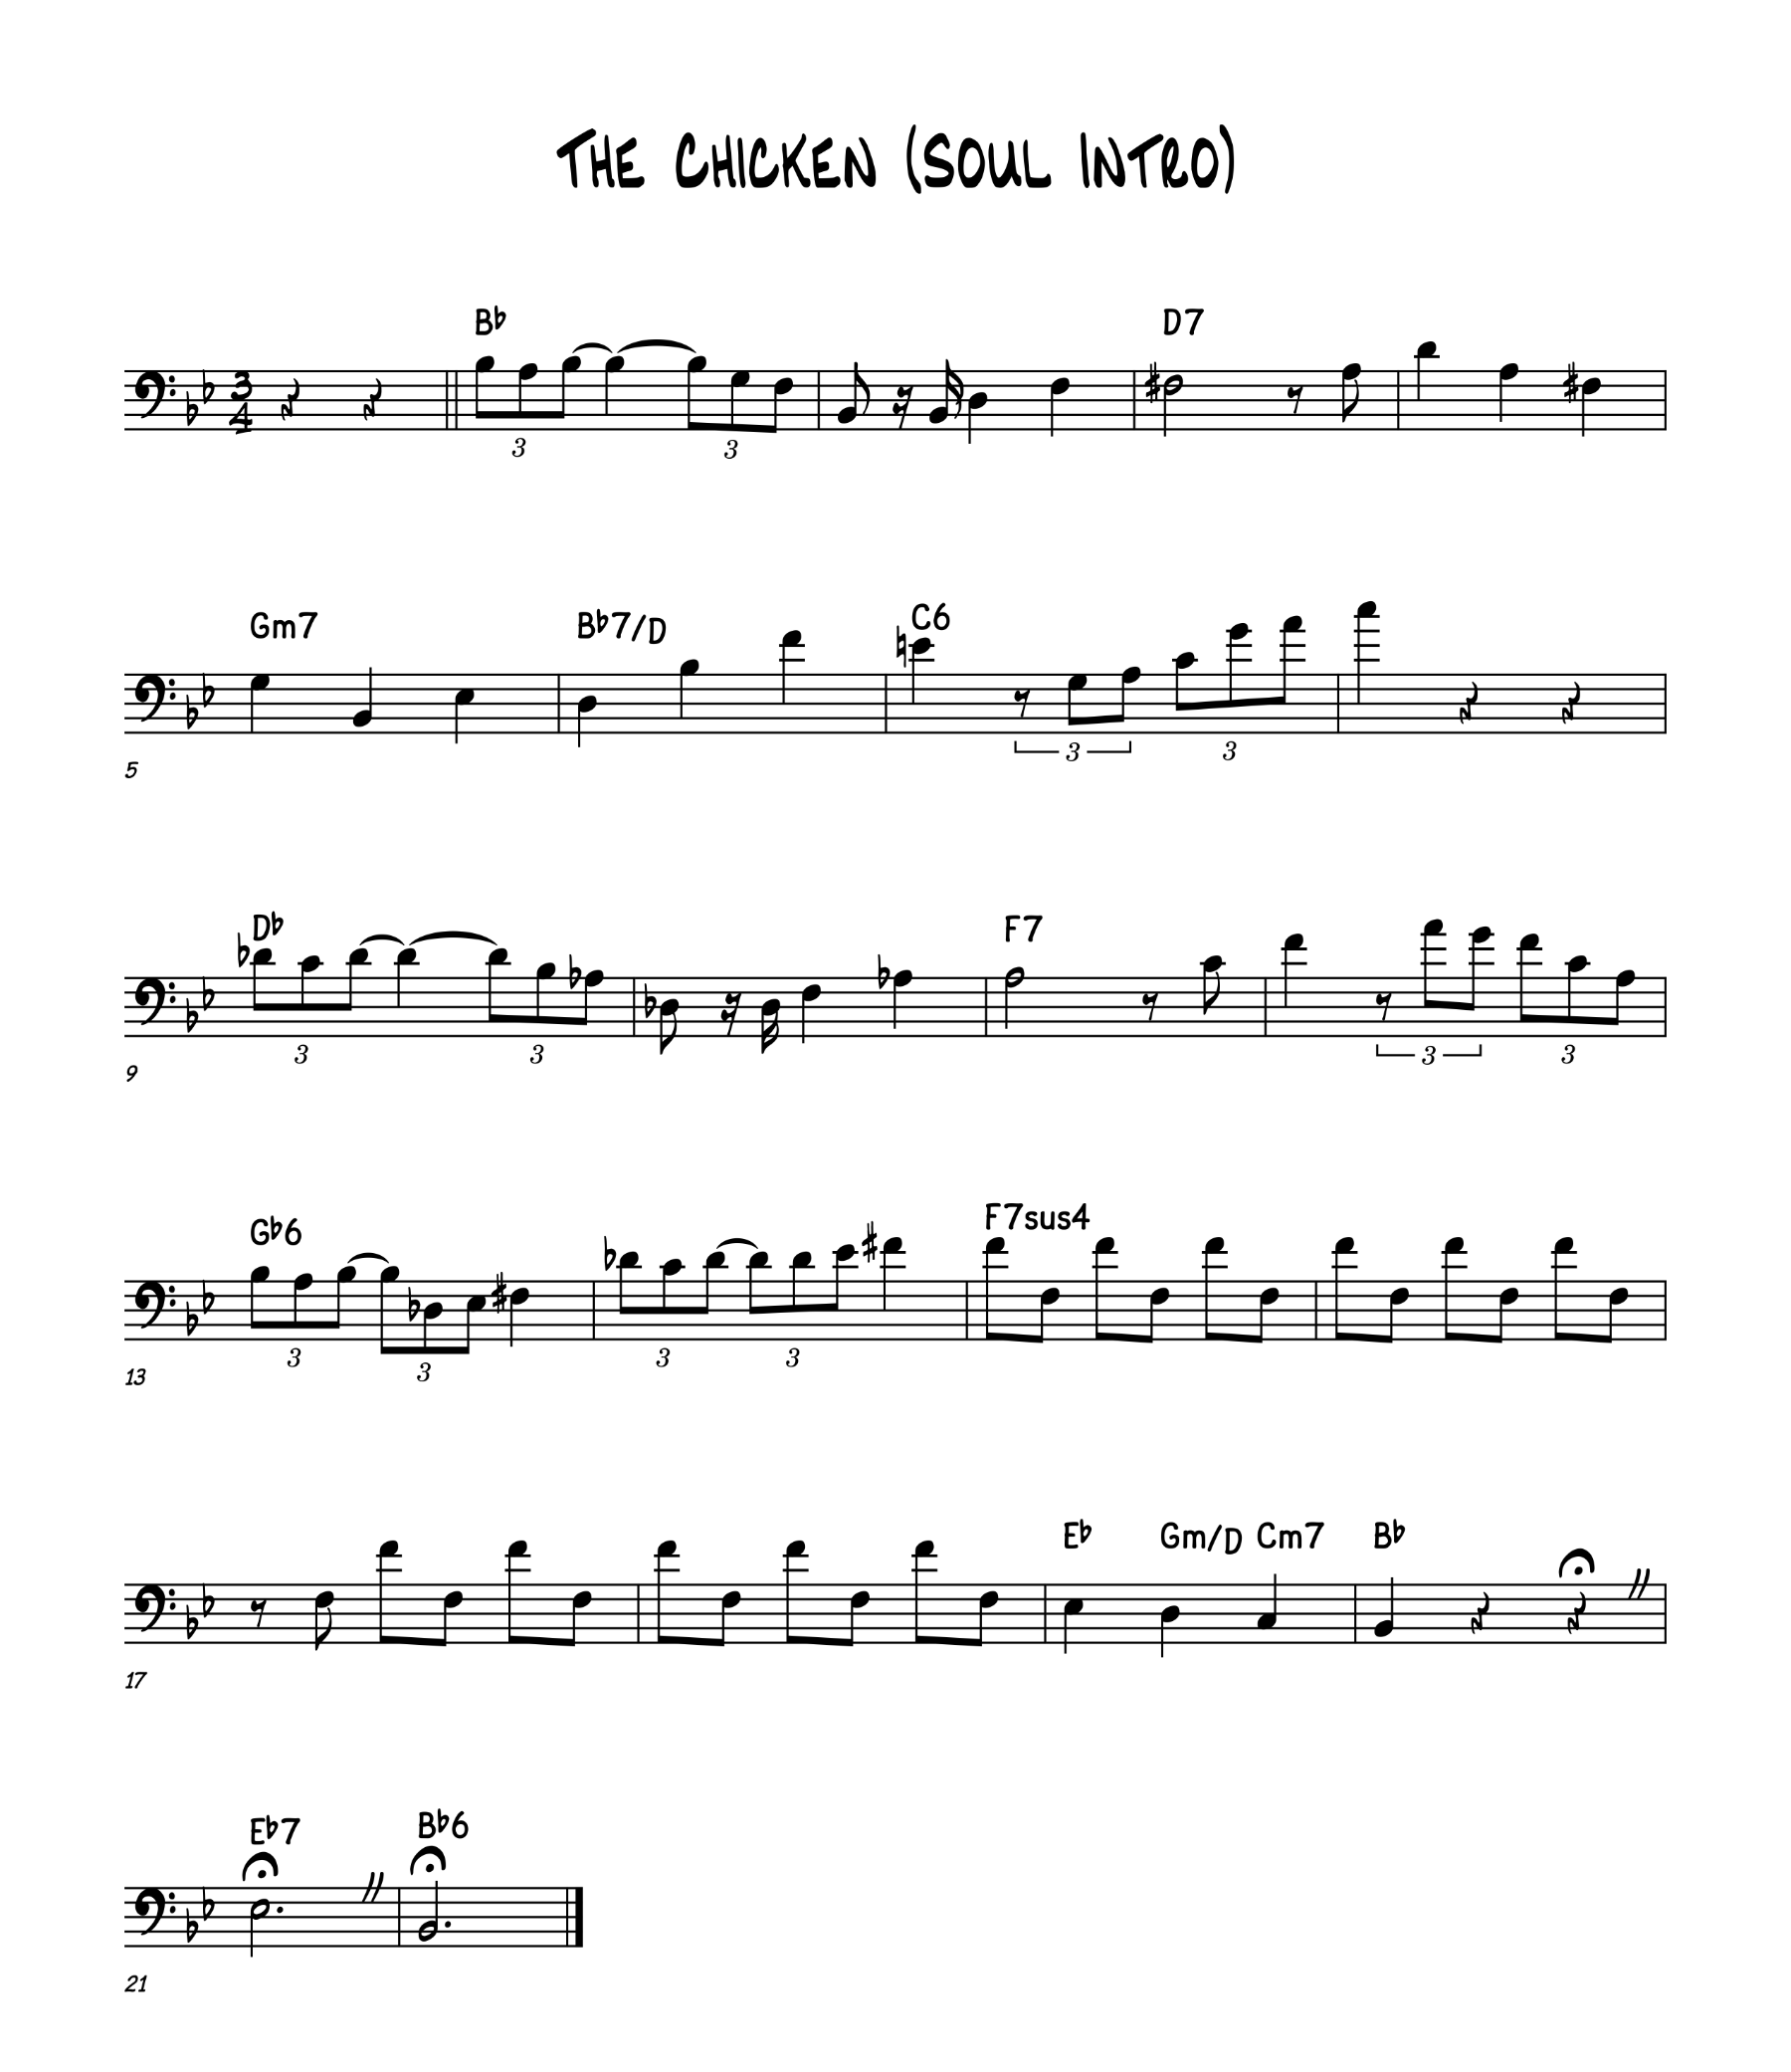
Jaco Pastorius: The Chicken/Soul Intro Chord Changes

Note: I’ve copied this over from my Patreon, mainly as an SEO experiment. These days I’m generally keeping the music-related stuff on YouTube and, to a lesser extent, Patreon, but I want to see whether this post is more “google-able” here or there.


This probably doesn’t warrant a full YouTube video. (Then again, maybe it does, but I have a gig this afternoon and I don’t have time to make one right now!)

The big band I play in (the one that has a gig this afternoon) has “The Chicken” in our books as an encore/jam. I don’t really use the sheet music for it at all because… well, every bass player should know how to play “The Chicken.” It’s just a 12-bar blues in B♭ with a funky groove.

“The Chicken” was written by Pee Wee Ellis when he was in the James Brown band, and was famously covered by the Jaco Pastorius Big Band in the early 1980s. The main part of the song, as I said, is a straightforward blues, but the Jaco recording begins with the “Soul Intro,” a gospel-infused, slow 3/4 intro.

My sheet music has a transcription of what Jaco plays in this intro, and I’ve memorized it, but it always helps to understand the underlying form when I’m going to be playing something like this.

Here’s the part as written (re-engraved by me in MuseScore so I can overlay the chords later; note that I’ve omitted a bunch of articulation marks because they’re not relevant here):

Once you’ve worked out where to play these lines on the fingerboard, this isn’t really that difficult to play. But I find that it’s a lot easier to work out where to play the lines if I understand the underlying chord structure.

I only have two things to go by here: this written out bass part, and the recording. I checked the rest of the books in our band library. I guess there’s no piano part, because the piano player is using the guitar part, and the guitar is just tacet in the intro. There’s also no score, and of course the changes for this wouldn’t be written in the horn parts. So, I’m on my own.

First I tried working out the chords just by looking at the bass part on its own. That got me… pretty close. But then I listened to the recording and tried playing the chords on the keyboard along with the music, and I discovered I was a bit off on a couple of them. (Specifically, it was minor details like treating the opening chord as a B♭Maj7 instead of just B♭, missing a passing ♭VII/II, not correctly guessing that the part where I’m just playing F octaves is, in fact, an F7sus4… stuff like that.)

Anyway, once I had both examined the written bass part and played my keyboard along with the recording, I came up with the chords shown below. How do you think I did?

To summarize in text, here are the changes as I have them (using percent signs for measure repeats):

B♭ | % | D7 | % |
Gm7 | B♭7/D | C6 | % |
D♭ | % | F7 | % |
G♭6 | % | F7sus4 | % |
% | % | E♭ Gm/D Cm7 | B♭ |
E♭7 | Bb6 ||

I’m still unsure about that 6 on the C6 in bar 7. It sounds weird played on the keyboard, so it’s mainly for the benefit of the bassist.

(Of course, I only noticed after I published this that MuseScore had notated the G♭s as F#s in bars 13 and 14. They’re G♭s in the original.)

Maybe I don’t really need a formal ADHD diagnosis

My undiagnosed ADHD brain this morning (abbreviated):

While making coffee, decided I was going to have a bagel. Got out the cream cheese and realized it was moldy. Washed out the container and went to throw it in the recycling. Discovered we didn’t have a paper bag for recycling under the sink. Went to the basement landing where we keep the paper bags. Discovered the motion sensor light wasn’t working. Replaced the bulb, but found both the bulb and the sensor were dead. Threw them both away and just installed a new bulb directly in the socket. Went back to the kitchen (surprisingly, remembering the paper bag for recycling!) and made a different breakfast since there was no cream cheese for the bagel. While eating, watched some YouTube videos. Glanced at my own YouTube channel stats, and went off on a stream of consciousness writing a script for a new YouTube video I’ll probably never make. Decided to have a second cup of coffee. While the water was heating up, noticed the stove needed to be cleaned. Took off the knobs to soak them in the sink, but found the sink drain was clogged. Took apart the sink drain to clear the clog. Realized the whole thing kind of needs to be replaced, but somehow managed to restrain myself from going to the hardware store right that instant. Cleared the clog and got things reassembled. Made my second cup of coffee. Decided I needed to document the morning here.

Still haven’t even started on my actual work for the day and it’s almost noon.

UoP: Now featuring “Dark Mode”

I have generally had an aversion to dark mode on devices. It’s not that I object to it aesthetically; I do think it objectively looks better most of the time. And it’s not just that I’m an old curmudgeon who wishes we were still running Mac System 7 on Motorola 68000 series processors, although I do have fond nostalgia for those times.

It’s really my eyes. And even then, it’s not that I’m an old curmudgeon with failing eyes — although my eyes have definitely deteriorated through my 40s and into my 50s.

It’s my astigmatism.

I don’t just have astigmatism; I have weird astigmatism. The axis between my two eyes is turned almost 90 degrees. I can’t get glasses with full correction because it forces the muscles in my eyes in opposing directions in such a way to give me an almost instant headache. Fortunately, I can correct it enough to see reasonably well. But I digress…

Dark mode is difficult for people with astigmatism. You know those optical illusion tricks where you stare at a dot in the center of a reversed-color image for 60 seconds, then look at a blank wall and the “burn in” in your eyes shows you the actual image? My eyes do that with white text on a dark background after about 10 seconds, to the point where I can no longer read anything on the screen.

So, I rarely use dark mode. But I know I’m in a small minority.

CSS media queries now include a prefers-color-scheme setting that lets you design your website to automatically adjust to the user’s light/dark mode preference. Combine that with CSS variables and it’s super easy to add dark mode to your website. In fact, I decided this morning to add dark mode to this site, and it only took me about 5 minutes. Choosing colors that actually look good can be a bit trickier, and you have to make judgment calls about some of your accent colors.

I decided to primarily just invert the neutral colors (white, black, grays) on my site, and I used this color inverter tool to find appropriate replacements. I didn’t change most of my accent colors, because they’re part of my brand, but I did switch to a lighter shade of blue for links, since I do already have two blues in my color palette.

I used this Dark Mode in CSS Guide for a few additional improvements, specifically using filter() to adjust the brightness and contrast on images (except my logo), as well as to tone down the intensity of the PrismJS code blocks, since — at least with the implementation I’m using — it doesn’t seem to support automatic color modes.

If you’ve got your device on dark mode, or “automatic” and it’s nighttime, you should see dark mode right now! If you’re like me though, you’ll only see it if you temporarily turn on dark mode for testing purposes. And now that I’ve done this, I’m switching back to light.

Toast (a poem)

I stand motionless
Staring into the hot orange glow
Tick… tick…
Seconds become minutes
Become years
Tick… tick…
The hot orange burns my eyes
As I feel death's icy grip upon my shoulder
Tick… tick…
Ding!
My toast is ready

PHP script to blast through a directory and shrink all of the images

This scenario needs a bit of setup, because without knowing the context, it would be logical to say, “Wait, you really should do this a different way.” Trust me. I tried all of the other ways.

I have a client who manages a grant program, and the grant recipients go to my client’s WordPress website to submit receipts and photos via Gravity Forms, in order to get their reimbursements.

The thing is, when you have hundreds of people who each need to submit multiple (sometimes many, sometimes “how the hell could you possibly need to submit that many???”) photos that they’ve taken on their phones, you’re going to end up with thousands of unnecessarily large JPEGs filling up your server.

I didn’t know, until the disk was already near capacity, that the client was even doing this, so I just needed to figure out a way to deal with in excess of 100 GB of disk usage. The client and their partner agency need to be able to continue accessing these files through the Gravity Forms admin, so I can’t move them somewhere else or even change the filenames — Gravity Forms’ gatekeeping download script won’t be able to find them.

There are some Gravity Forms add-ons for processing file uploads, but they generally need to be put in place before people start uploading files. So I resorted to a brute-force, command line PHP script to get the job done.

Fortunately the GD library is great for manipulating images. Its PHP functions are perfect for opening JPEGs and PNGs, creating new ones, scaling them down, cranking up the compression, etc. These images don’t have to be hi-res and beautiful; they just need to be legible. So I can really go to town on them, reducing the file size of many of them by 90% or more.

Here’s my script, with some added comments. It’s a bit quick-and-dirty. The shrink.php script file has to be in the same directory as the images, and it doesn’t work recursively. This restriction was mainly just to get something cobbled together, but I actually see it as a benefit because if something goes wrong, you’re limiting your losses to a single directory.

Initially I had a minor error that would cause the script to continue to cut the dimensions of images in half if you ran it multiple times, which I only realized after I accidentally ran it twice on the same directory — oops. (I was thankful at that moment that the single-directory restriction exists!)

Anyway… here’s what the script does. It blasts through all of the files in the same directory as the script itself, looking only for PNG and JPEG images.

For each image, it creates a new version at the same aspect ratio, but with a width of 1600, 800, or 400 pixels — scaling down to the nearest size from whatever the original size was. (It doesn’t do anything with images under 400 pixels wide.)

Then it re-saves them with more extreme compression applied. 70% quality for JPEG, and… well… as much compression as PNG allows. (I don’t really know much about PNG compression.)

If it finds that it didn’t actually reduce the file size, it restores the original. Otherwise, the original is gone, and your disk space is reclaimed.

It provides some verbose output telling you how much it reduced each file, and then gives an overall total reduction in MB when it’s complete.

This script could be polished up more, but even as it is I think it’s a lot better than the confusing and error-riddled suggestion I found on StackOverflow (on which it’s very loosely based, combined with a healthy dose of consulting the official PHP documentation). Enjoy!

// Get the list of files from the current directory
$images = glob('*');

// We'll tally up our savings
$total = 0;

// Loop through all of the files and run the function on them
foreach ($images as $file) {
  $formats = array('png', 'jpg', 'jpeg');
  $ext = strtolower(pathinfo($file, PATHINFO_EXTENSION));
  
  // We only want to process PNG or JPEG images
  if (in_array($ext, $formats)) {
    $total = $total + resize_image($file);
  }
}

// All done; tell us how we did
echo "=====================\n" .
     "SHRINK COMPLETE\n" .
     "TOTAL REDUCTION: " . round($total / 1024, 2) . " MB" .
     "\n\n";


// The resizing function (obviously)
function resize_image($file) {
  $formats = array('png', 'jpg', 'jpeg');
  $ext = strtolower(pathinfo($file, PATHINFO_EXTENSION));
  
  // Yes this is a redundant format check, just to be safe
  if (in_array($ext, $formats)) {
  
    // Get the old file size for later reference
    $old_size = round(filesize($file) / 1024, 2);
    
    // Set our maximum allowed width
    $max_w = 1600;
    
    // Get the dimensions and aspect ratio of the original file
    list($old_w, $old_h) = getimagesize($file);
    $ratio = $old_h / $old_w;
    
    // Set the new dimensions
    // Shrink to $max_w, 1/2 of $max_w or 1/4 of $max_w, depending on original size
    // >= is important so we don't keep cutting the dimensions in half if we run it again!
    $new_w = ($old_w >= $max_w) ? $max_w : (($old_w >= $max_w / 2) ? $max_w / 2 : $max_w / 4);
    $new_h = $new_w * $ratio;
    
    // Create our new image canvas
    $new_img = imagecreatetruecolor($new_w, $new_h);
    
    // Get the original image, minding the source format
    $old_img = ($ext == 'png') ? imagecreatefrompng($file) : imagecreatefromjpeg($file);
    
    // Scale down the original image and copy it into the new image
    imagecopyresampled($new_img, $old_img, 0, 0, 0, 0, $new_w, $new_h, $old_w, $old_h);
    
    // Keep a backup of the old file, for the moment
    rename($file, $file . '_BAK');
    
    // Save the newly reduced PNG...
    if ($ext == 'png') {
      imagepng($new_img, $file, 9, PNG_ALL_FILTERS);
    }
    // ...or the newly reduced JPEG
    else {
      imagejpeg($new_img, $file, 70);
    }
    
    // Did it work?
    if (file_exists($file)) {
    
      // Get the size of the new file, and the difference
      $new_size = round(filesize($file) / 1024, 2);
      $diff = $old_size - $new_size;
      
      // Hold up -- the old one is smaller! We'll restore it
      if ($diff < 0) {
        echo "Unable to reduce size of " . $file . "; original file restored.\n";
        unlink($file);
        rename($file . '_BAK', $file);
        
        // We're returning the KB savings, which is 0 in this case
        return 0;
      }
      
      // We reduced the file successfully, let's report success and delete the backup
      else {
        $pct = round(($diff / $old_size) * 100, 2);
        unlink($file . '_BAK');
        echo "Shrunk " . $file . " from " . $old_size . " KB to " . $new_size . " KB (" . $pct . "% reduction)\n";
      }
    }
    
    // It didn't work; report the error and restore the backup
    else {
      echo "Error processing " . $file . "; original file restored.\n";
      rename($file . '_BAK', $file);
      return 0;
    }
    
    // Pass back the KB savings so we can calculate a grand total
    return $diff;
  }
  
  // We didn't do anything so return 0 to keep the running total going
  return 0;
}

P.S. As always, all code samples are provided as-is with no warranty. Don't blame me if you use this and it blows something up!

P.P.S. I finally bothered to install prism.js on here for this. Now I need to back through and edit all of my older posts with code samples in them. Ugh.