Most of the time I tell clients we can’t customize the appearance of <select> menus (a.k.a. “dropdowns”), along with checkboxes and radio buttons. I lay out a whole rationale on the part of OS and browser developers for why these elements can’t be customized, which is perhaps marginally factual. I do think these elements are, by intention, difficult to customize, in order to avoid confusing users. But designers want to design and, to be honest, the browser defaults for these elements are pretty freaking ugly.
Often there are complicating factors that really do make it effectively impossible to customize these elements. And so far I have not found any way to customize radio buttons and checkboxes that don’t involve “faking” them with images and hidden inputs. Solutions that may achieve the desired appearance but that are oh so ugly on the inside.
I’ll also admit that I am usually the developer on a project, not the designer. But at the moment I am working on a project where, OK, I’m still not the designer, but I have taken responsibility for extending the design, which affords/requires of me making some design decisions. And when I’m the one designing things, I care a lot more about finding a way to make them look exactly like what I’ve envisioned.
So, we come to <select> menus. While it’s not really possible to do much with radio buttons and checkboxes, there at least are some CSS properties that these menus will take. Unfortunately they vary a lot between browsers and don’t solve every problem.
Most solutions I’ve seen for modifying the appearance of <select> menus involve wrapping the menu in a container <div> or <span> tag, essentially removing all of the CSS properties from the menu element itself, and then styling the container as desired.
I hate this solution. I want to be able to style the <select> itself, and be done with it. And at last I have found a solution that mostly accomplishes this, with the caveat that it does not work in Internet Explorer before version 10. But I have a fallback for IE 9 and earlier that does almost everything. And I haven’t tested in Opera because… come on. (OK, I’ve heard Opera is popular in Europe, but to be honest all of my clients are in the United States and do not do business in Europe, so it doesn’t matter. No one I have dealt with has ever cared if their site worked in Opera. Or probably even known it exists.) I should also probably just note that my company no longer supports Internet Explorer 7 or earlier, so we’re only concerning ourselves here with making sure it at least looks OK in IE 8.
OK, so how does this work?
Pretty much every browser supports some basic customizations of the <select> menu with CSS, like changing the background color, font, text color, size, etc. But there’s extra browser “appearance” junk we need to get rid of. Mostly the little up/down arrow at the right end of the menu that is the visual cue to users that it is a menu. That’s an important thing… we need to still provide some visual cue that it’s a menu. But I want to make it look the way I want to make it look.
Let’s start by getting rid of the browser junk.
select {
-moz-appearance: none;
-webkit-appearance: none;
appearance: none;
}
That removes all of the standard browser styling from Mozilla (Firefox) and WebKit (Chrome and Safari). I’m not sure we really need appearance or if it actually does anything in any known browser, but I saw it in an example somewhere and I hate using vendor prefixes without also including the non-prefixed version of the same property, so there it is.
So that covers three of the four major browsers. But what about Internet Explorer? There’s a tidy solution that works in IE 10 and later:
select::-ms-expand {
display: none;
}
Now we have a <select> menu with none of the standard browser junk, and we can apply our styles as needed. As for Internet Explorer 9 and earlier, you’ll just have to live with the arrow thing at the right end of the menu. I’ll explain in a bit the way to add separate styles just for those earlier versions of IE, using conditional comments, in case you’re not familiar.
I do recommend designing your own “arrow thingy” icon for the right side of the menu, so users can still tell it’s a menu. Here’s an example of how your full <select> CSS might look. (This is fairly close to what I am using in the site I’m actually working on, although the colors, fonts and padding differ slightly.)
select {
-moz-appearance: none;
-webkit-appearance: none;
appearance: none;
background: rgb(238,238,238) url('images/select.png') right 5px center no-repeat;
background-size: 9px 15px;
border: 1px solid rgb(221,221,221);
border-radius: 0;
color: rgb(34,34,34);
font-family: ‘Proxima Nova’, sans-serif;
font-size: 100%;
height: 2em;
line-height: 2em;
min-width: 60%;
padding: 0 25px 0 10px;
width: auto;
}
select::-ms-expand {
display: none;
}
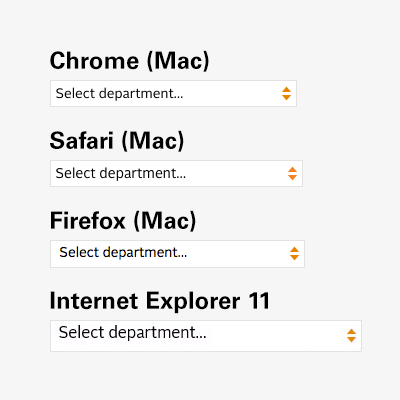
Here’s what the results look like in different browsers.

So, there’s an issue with the text alignment in Internet Explorer. As of this writing I’m working on resolving that. There are also some more minor variations between browsers in size and alignment, but that’s the nature of this business. Firefox also antialiases differently than Chrome and Safari, and I (usually) don’t bother trying to compensate for that. (The significant size difference in the IE sample is due to scaling at different breakpoints in my responsive layout… just a side effect of how I took the screenshots.)
That just leaves IE 9 and earlier. As I said, there’s no equivalent to select::-ms-expand before IE 10, so while we can change many aspects of the appearance of the menu, we can’t get rid of the standard arrow button thing. Unfortunately, if we implement the code above, we end up with both our custom arrows and the default ones, side-by-side. The only solution here is to get rid of ours, and remove the extra padding we gave it. This is where conditional comments come in. They’re well named: conditionals within HTML comments, recognized only by Internet Explorer. You can even target specific versions of IE with them. In this case, we just need to target versions before 10.
One common convention for conditional comments has you wrap the <html> tag itself in them, applying a class (e.g. ie8 that can then be used throughout your HTML everywhere else to target that browser. That’s great, but I never use it myself because I’ve gotten to a point where I rarely need to write any IE-specific CSS. So I just use the conditionals to load a separate ie.css file when I need it.
Here’s an example of how this might look. It should go in your <head> section, after you’ve included the main CSS file:
<!–[if lt IE 10]>
<link rel="stylesheet" type="text/css" href="css/ie.css" />
<![endif]–>
And then in your ie.css file, you’ll need to override the background and padding:
select {
background-image: none;
padding-right: 0;
}
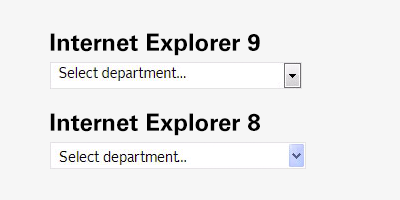
…and this is what it looks like in IE9 (and, just for fun, IE8 as well):

Obviously my styles are extremely basic — not really that different from what older versions of IE show anyway — but this does the job. As a test, I made the background bright red to prove it worked across the board. It does. But the results made my eyeballs bleed, so I’ll spare you.
But here’s something fun… how it looks on an iPhone with high resolution.

The arrow graphic is replaced with a high-res version using CSS3 media queries.
@media only screen and (-moz-min-device-pixel-ratio: 1.5),
only screen and (-o-min-device-pixel-ratio: 3/2),
only screen and (-webkit-min-device-pixel-ratio: 1.5),
only screen and (min-devicepixel-ratio: 1.5),
only screen and (min-resolution: 1.5dppx)
{
select { background-image: url('images/select_x2.png'); }
}
(Yes, there’s an Opera vendor prefix in there. Forget about what I said earlier. Or not. This is just a standard block of code I always use for high-res images in my media queries.)
Depending on the complexity of your design, this approach may not offer quite as much control as you need, compared to the <div> wrapper approach, but if you’re just trying to get something clean and simple, with customized colors and fonts and without the outdated 3D styles most browsers stick you with, this should do the trick.


